Data Storage
Learn about data storage within the super.AI platform, including how to upload data to storage, add data to your project using storage, and more.
Input data often includes files (e.g., images, videos, or audio). You can upload these files directly to your project. However, sometimes it’s better to place your files in private storage, so they can be referenced by a URL. This is particularly useful in the following situations:
- Your input data contains files alongside additional data and you need to associate the two (e.g., an image and a caption)
- You want to use your files multiple times, possibly in multiple projects, without having to upload them every time
Our free, centralized storage makes your data accessible through the super.AI API and via unique, private, and secure URLs. This ensures that our labelers have access to your files strictly for the time necessary to conduct their labeling task.
This page contains the following sections:
- How to upload data to your storage
- Organizations as Data Owners
- Repairing Corrupted Files
- How to add data to your project using storage
- How to download, delete, and order your data
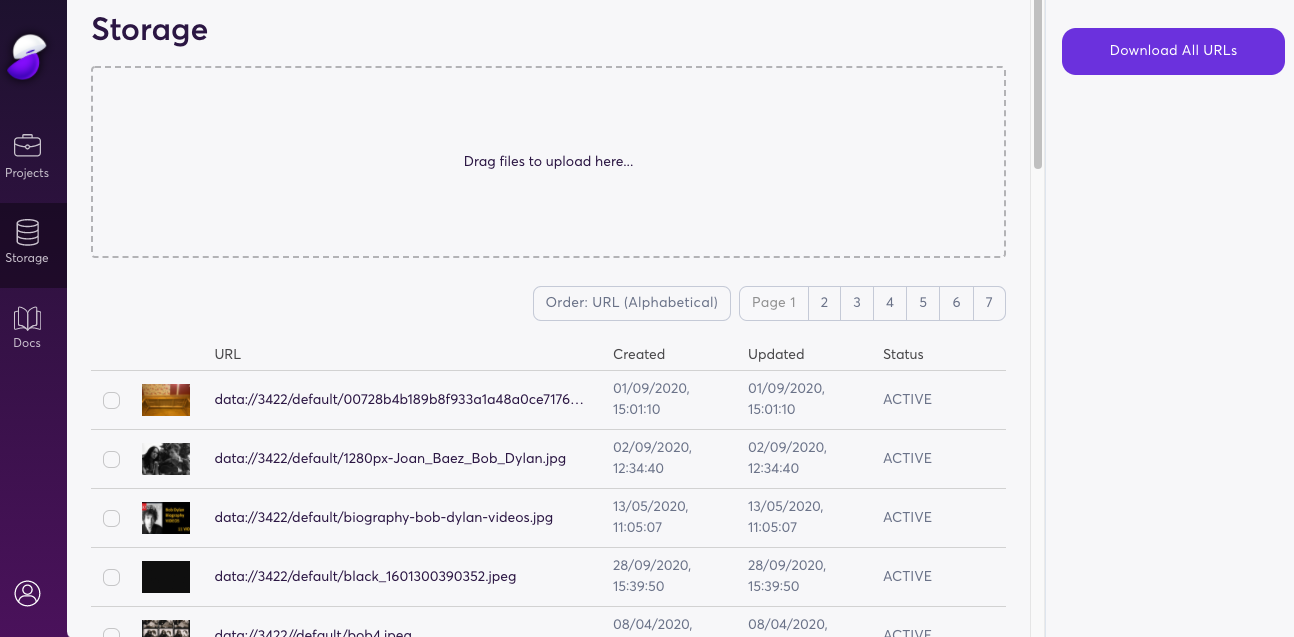
The data storage page
How to upload data to storage
- Open the super.AI dashboard
- Head to Storage in the left-hand menu
- Drag and drop files into the upload box or click the box to navigate to the files or folder you want to upload
Once uploaded, your files will appear in the storage list below the upload box.
Upload via APIIf you want to use the super.AI API to upload data to your storage, check out our API reference.
You can download all your data URLs using the Download all URLs button on the right side of the storage page. They will be packaged in a single JSON file for download.
You can use the URLs you see here as inputs when you add data points to your project for processing.
How to add data to your project using storage
Once your data is in storage, it is accessible via internal URLs (data://…). You can use these URLs to submit data points for processing. The URLs must be arranged in a JSON or CSV file. The maximum size of this file is 4 MB.
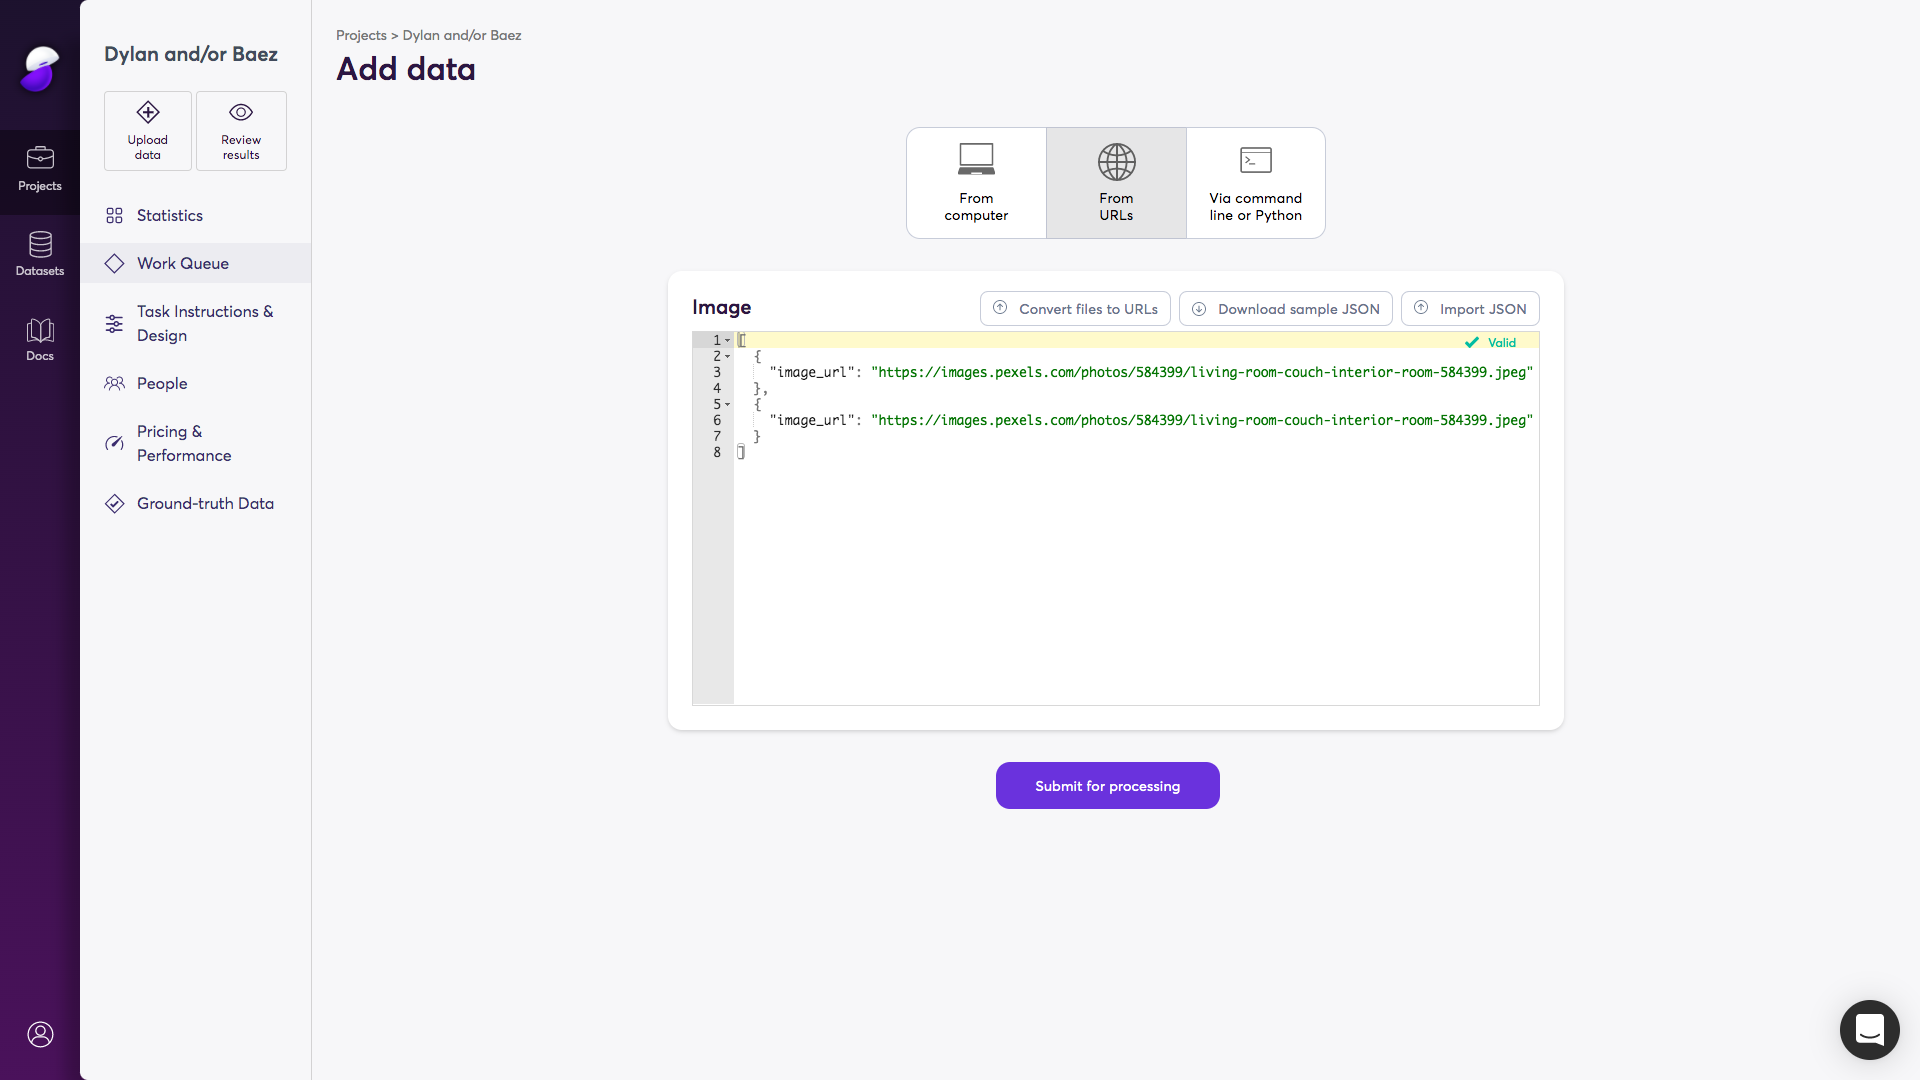
A sample input JSON file in the data point submission process
The process looks like this:
- Upload your data to storage
- Download a JSON or CSV file with the URLs of your stored data
- Transform the JSON or CSV file into the format required by your project
- Upload the JSON or CSV file to your project
The format of the JSON or CSV file you upload to your project depends on the project type that you’re using. You will find an example file that you can edit or download by opening your project in the super.AI dashboard, clicking Upload data in the top left, then clicking on From URLs or Via JSON.
Example: image categorization
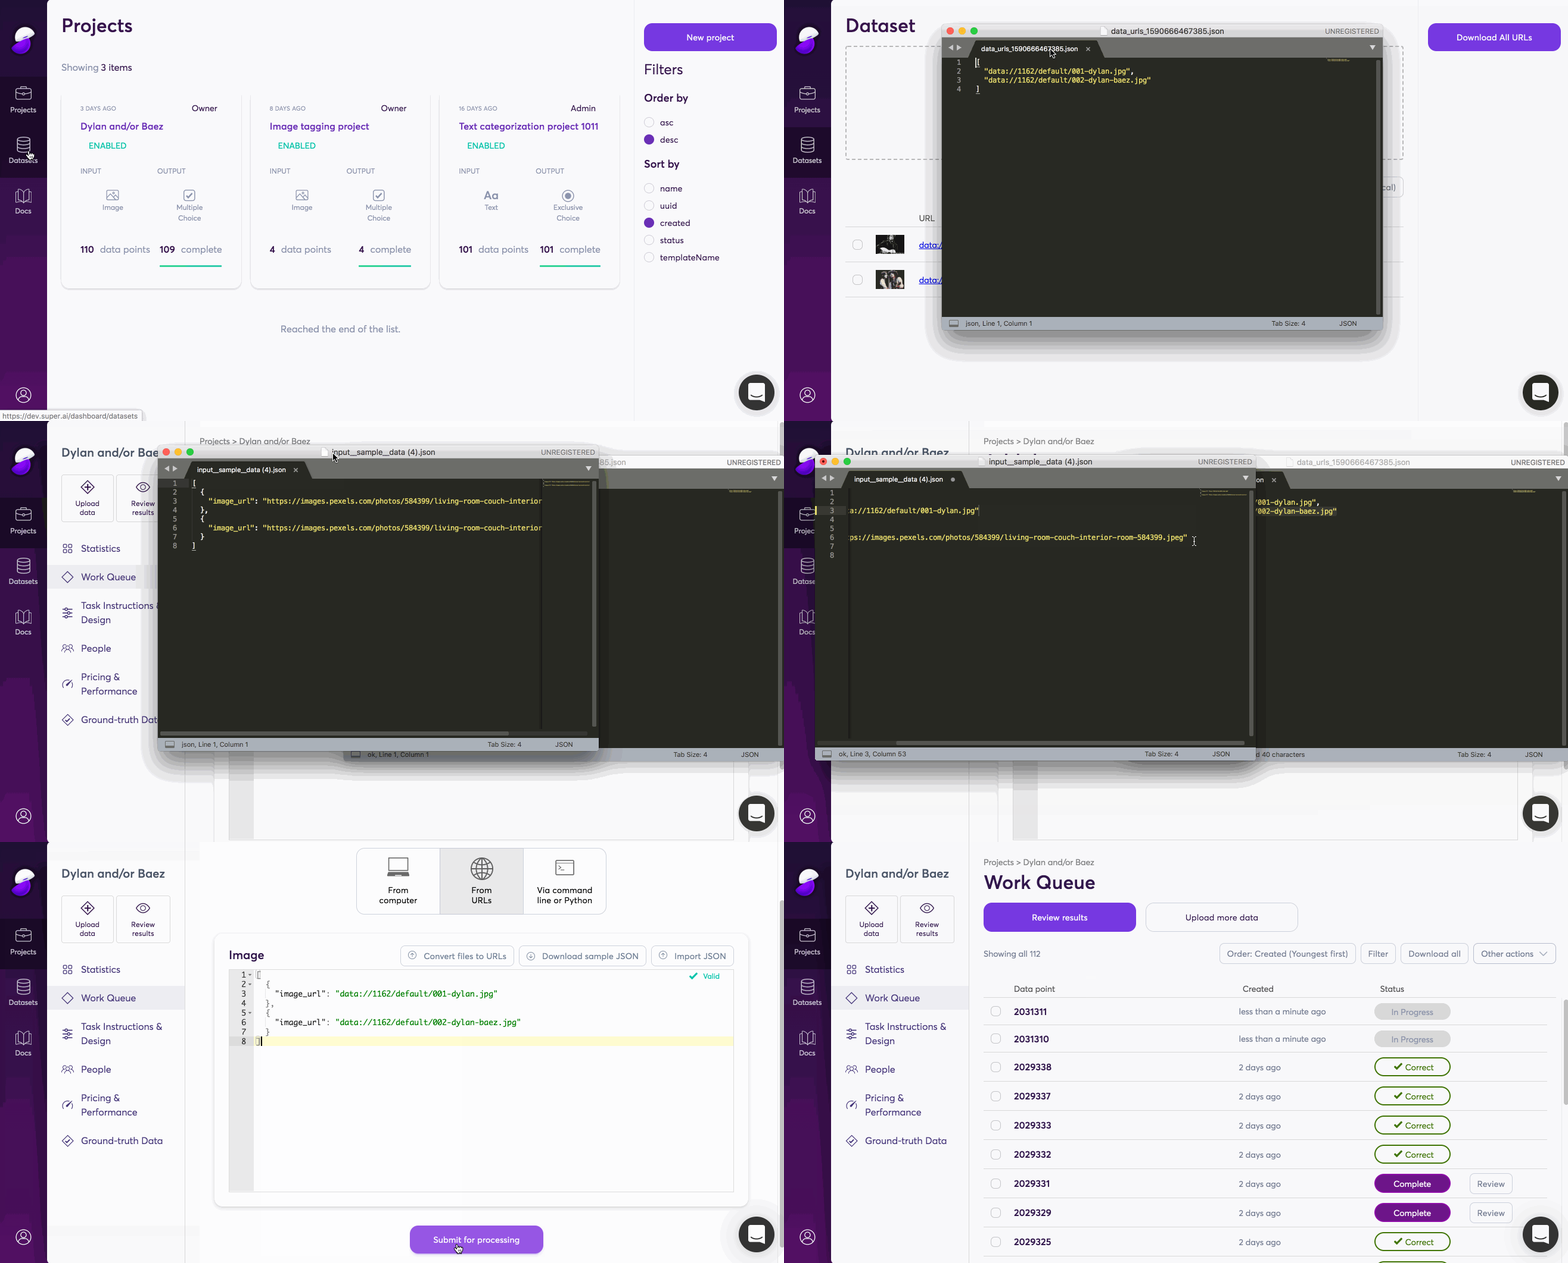
An animation showing how to submit data points using JSON
An image categorization project will have an input that looks something like this:
[
  {
        "image_url"="data://1234/default/example.jpeg"
  },
  {
        "image_url"="data://1234/default/example-02.jpeg"
  }
]
image_url
data://1234/default/example.jpeg
data://1234/default/example-02.jpegWhen you download your data URLs, you get a list of data:// URLs in JSON format, like this:
[
  "data://1234/default/biography-bob-dylan-videos.jpg",
  "data://1234/default/bob2.jpeg",
  "data://1234//default/bob3.jpeg",
  "data://1234/default/bob4.jpeg",
  "data://1234//default/bob5.jpeg",
  "data://1234//default/bob6.jpeg",
  "data://1234//default/bobby-d-01.jpeg",
  "data://1234/default/Bob-Dylan-and-Levon-Helm.jpg",
  "data://1234/default/bob-dylan-bd0001jf.jpg",
  "data://1234/default/bob-dylan-bd001lr.jpg"
]
You will need to insert these into the input JSON as the value to the input type key (image_url) or into your CSV as a series of new rows:
[
  {
        "image_url"="data://1234/default/biography-bob-dylan-videos.jpg"
  },
  {
        "image_url"="data://1234/default/bob2.jpeg"
  },
  {
        "image_url"="data://1234//default/bob3.jpeg"
  },
  {
        "image_url"="data://1234//default/bob4.jpeg"
  },
  {
        "image_url"="data://1234//default/bob5.jpeg"
  },
  {
        "image_url"="data://1234//default/bob6.jpeg"
  },
  {
        "image_url"="data://1234//default/bobby-d-01.jpeg"
  },
  {
        "image_url"="data://1234/default/Bob-Dylan-and-Levon-Helm.jpg"
  },
  {
        "image_url"="data://1234/default/bob-dylan-bd0001jf.jpg"
  },
  {
        "image_url"="data://1234/default/bob-dylan-bd001lr.jpg"
  }
]
image_url
data://1234/default/biography-bob-dylan-videos.jpg
data://1234/default/bob2.jpeg
data://1234//default/bob3.jpeg
data://1234/default/bob4.jpeg
data://1234//default/bob5.jpeg
data://1234//default/bob6.jpeg
data://1234//default/bobby-d-01.jpeg
data://1234/default/Bob-Dylan-and-Levon-Helm.jpg
data://1234/default/bob-dylan-bd0001jf.jpg
data://1234/default/bob-dylan-bd001lr.jpgIf your project requires multiple inputs, you might need to group the data URLs with the other input data. For example, the input format for an audio-verification project might look like this:
[
  {
    "audioUrl":"data://1234/default/example01.mp3",
    "text":"The rain in Spain falls mainly on the plains"
  },
  {
    "audioUrl":"data://1234/default/example02.mp3",
    "text":"In Hertford, Hereford, and Hampshire, hurricanes hardly happen"
  }
]
audioUrl, text
data://1234/default/example01.mp3, The rain in Spain falls mainly on the plains
data://1234/default/example02.mp3, In Hertford, Hereford, and Hampshire, hurricanes hardly happenHow to manage your data storage
Once you have added data to your storage, you can use the guides below to download the URLs, delete data, and reorder your data on the storage page.
The URLs you download allow you to use stored data in your project.
How to download all URLs
From the storage page, you can download a JSON file containing all your data URLs by clicking Download all URLs at the top right of the page.

The Download all URLs button as it appears in the dashboard
How to download one or more URLs
- Go to the super.AI storage page
- Use the checkboxes in the left-most column to select the data for which you want the URLs
- Click Download URLs under Actions in the right-hand menu
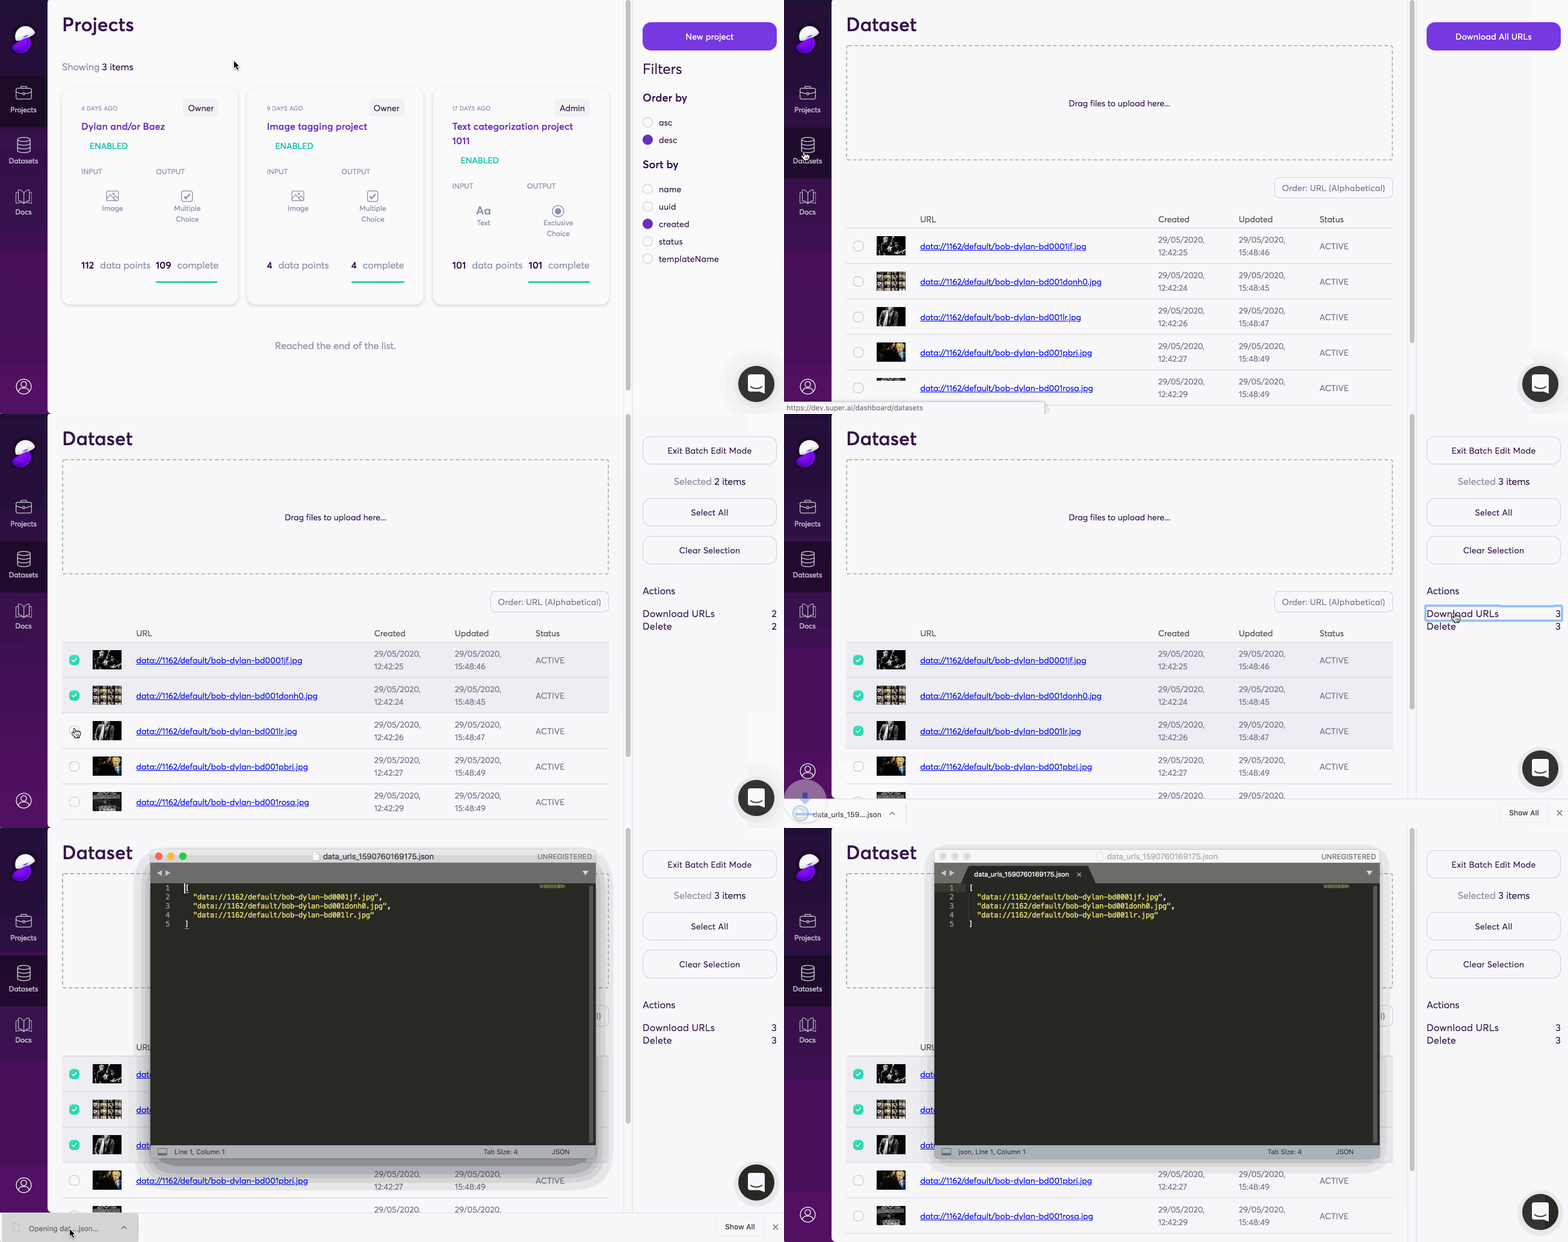
An animation showing how to download one or more or your data URLs
How to delete data
- Head to your super.AI storage
- Use the checkboxes in the left-most column to select the data that you want to delete
- If you want to delete all your data, select a data point using the checkbox, then hit Select All in the right-hand menu
- Click Delete under Actions in the right-hand menu
- Confirm your choice by hitting Yes
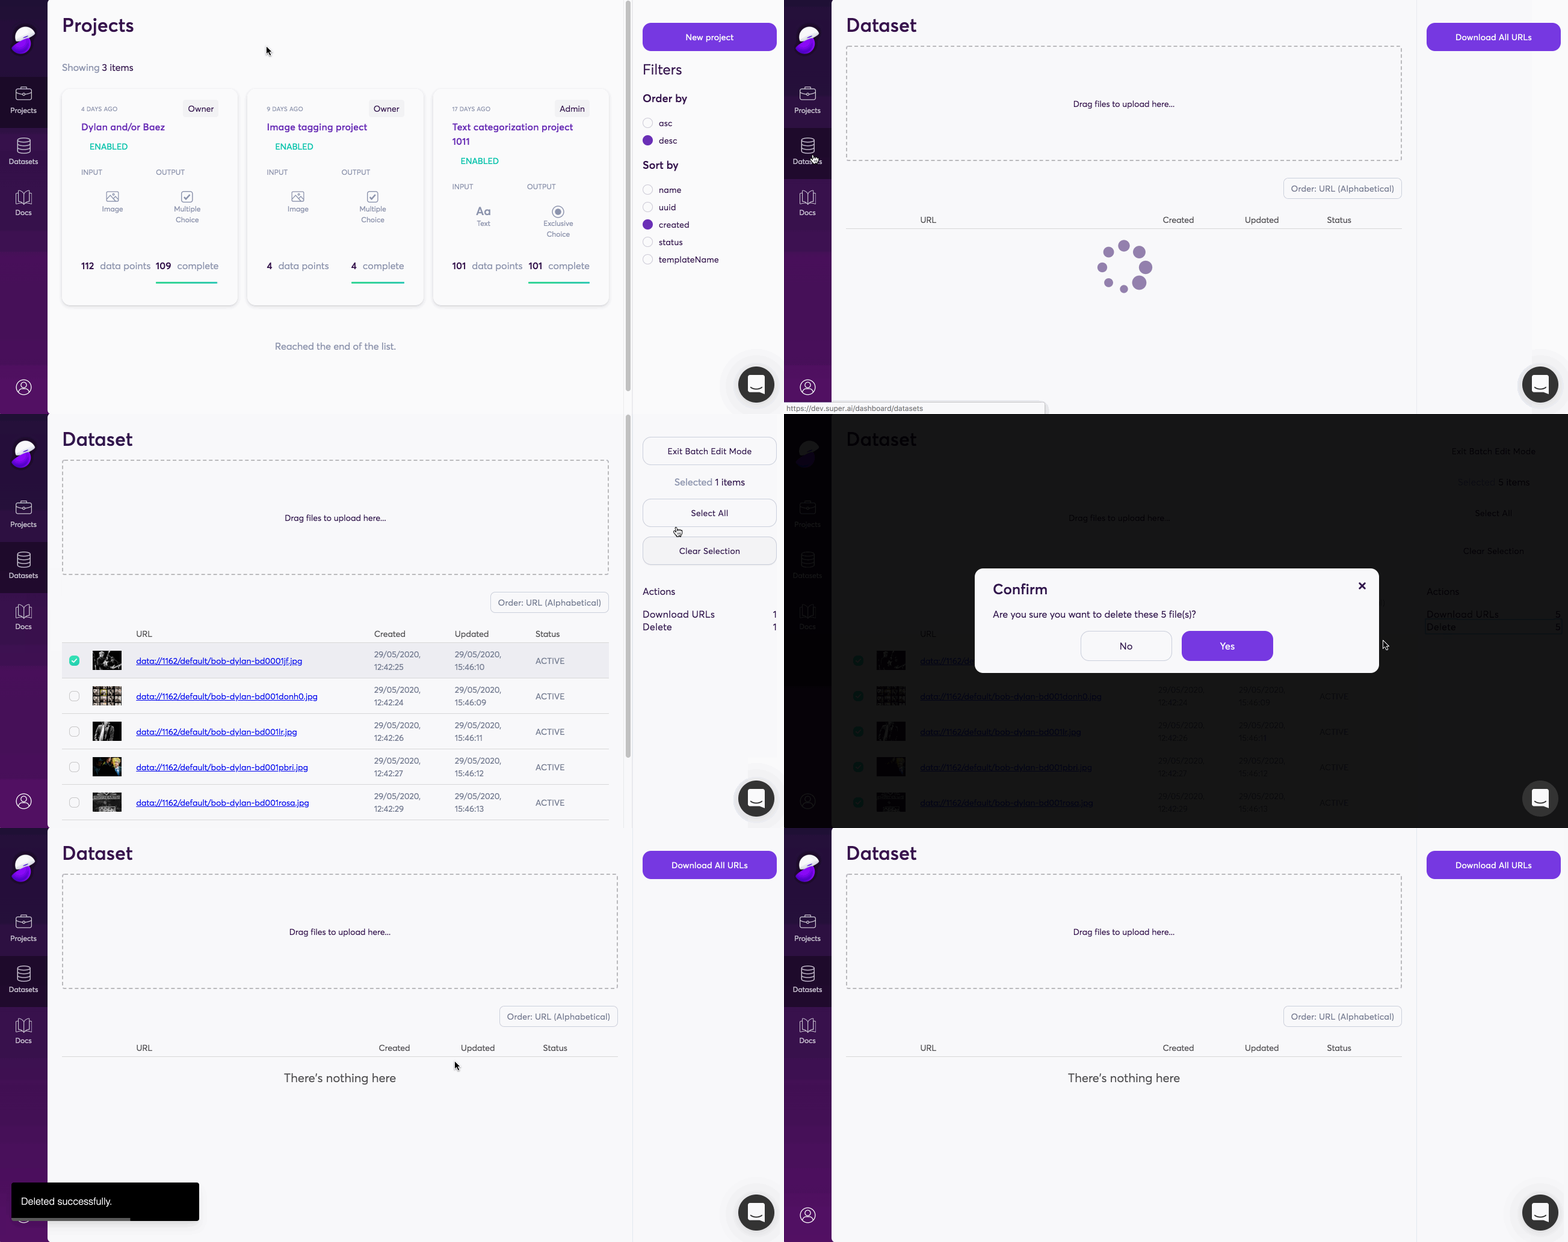
An animation showing how to delete data
How to change the order your data is displayed in
The order option above the list of your data points provides a way to reorganize your data for a more convenient overview. Here are the order options available:
- URL
- Sort your list by the data URLs pointing to your files. You can go for either alphabetical or reverse alphabetical order.
- Created
- Sort by the creation or upload date of the data. You can start with the earliest (i.e., oldest) or latest (i.e., most recent) data at the top.
- Updated
- Sort by when the data was last updated or changed. As with
created, you can set this option to have either the earliest or latest updated at the top of your list.
- Sort by when the data was last updated or changed. As with
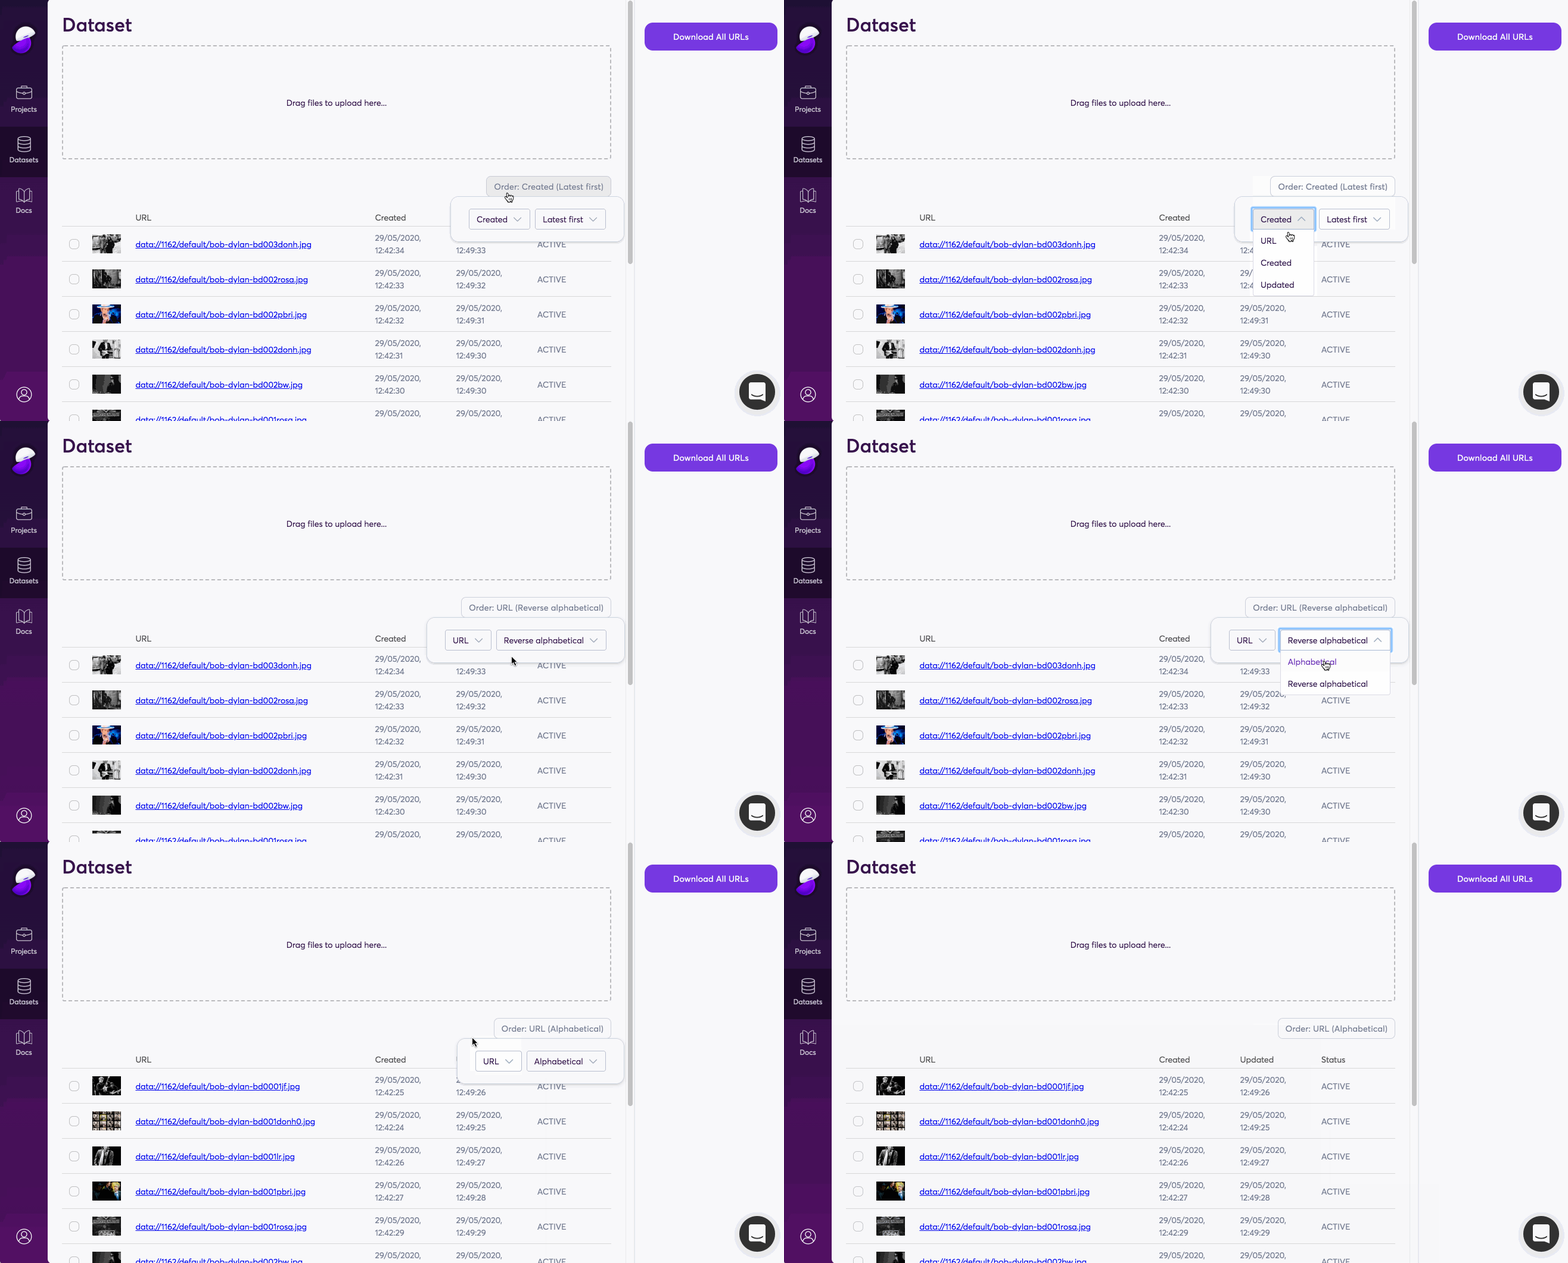
An animation showing how to order your data
Updated 5 months ago
