Command-line Interface (CLI)
Learn how to submit jobs to the super.AI platform using the CLI.
The super.AI API provides programmatic access to super.AI. This guide gets you set up with our command-line interface (CLI). We’ll show you how to submit your first jobs using the CLI and view them in your dashboard.
cURL, Python, and the CLIThis guide uses the super.AI CLI, but you can also interact with our API using cURL or Python.
If you're new to APIs, take a look at our Introduction to REST APIs to learn the the basics.
There are four steps required to submit your first job to super.AI through using our CLI:
- Install the super.AI API client so you have the tools needed to interact with our API
- Log in to the CLI tool so super.AI can authenticate your request
- Locate your project ID to identify the project to which you are submitting the job
- Send a CLI command and observe the response to confirm your jobs were submitted
You will need to create and set up a super.AI project before you can follow the steps below. You will need to use the image categorization project type to follow this guide.
Python requirementThis guide requires Python 3.6 or later. You can check which version you have installed by running
python --versionin your terminal. You can download Python here.
1. Install the super.AI API client
In your terminal window, enter the following command and press enter:
$ pip install superaiYou should see confirmation of a successful installation.
2. Log in to the CLI tool
You need to provide your super.AI account username and password so we can authenticate your request. To do this, copy and paste the following command into your terminal, replacing {username} with your super.AI username, and press enter:
$ superai login --username {username}When prompted, enter your super.AI password and press enter again. You should receive a confirmation that your API key has been set:
Api key live_1Ab23cdEFGH4iJ5K67Lmnop8qR10STuvWX_2y3Za4_B was setIf you created your account through Google Sign-In, you will need to manually set your API key:
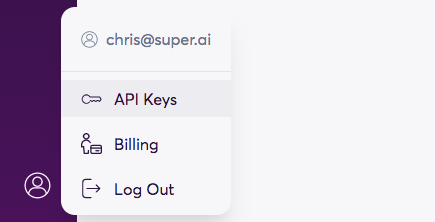
- Find your API key in the super.AI dashboard by hovering over the profile icon in the lower left of the screen, then heading to API keys. You can copy the key by clicking on the copy
 button.
 - Provide your API key to the client by using the following command (replacing
{api-key}with your actual API key):superai config --api-key {api-key}

3. Locate your project ID
The project ID is essential to identify the project to which you want to submit a job.
In the super.AI dashboard, open the image categorization project that you created previously. The project ID is the universally unique identifier visible in your browser's URL bar.

You’re going to pass us the project ID as part of your CLI command, as you’ll see in the next step.
(Optional) Upload data to storage
For the purposes of this guide, we provide you with a URL for an image in the next step. If you want to upload your own images, you can upload them to your super.AI storage and generate URLs for them there. To find out more, head to our How to use data storage page.
4. Send a CLI command
There are three essential elements to your CLI command:
- The CLI command. This tells our API what type of request you’re making. In our case, this is
create_jobs. - The project ID. You will use the
--app_idflag to pass this information. - The input data for the job. This is passed through the
--inputsflag. This flag takes an array of objects. The input type (in our caseimage_url) is the key of each object and the URL pointing to the file is the value. It is possible to use multiple objects within the array to submit multiple jobs at once.
In the example command below, you will need to make the following change:
- Replace
{project_id}with your project ID from step 3
Copy the codeblock below into a text editor, make the above adjustment to it, then copy and paste the edited code into your terminal and press enter.
$ superai client create_jobs \
      --app_id {project_id} \
      --inputs [{\"image_url\":\"https://cdn.super.ai/cool-bulldog.jpg\"},{\"image_url\":\"https://cdn.super.ai/hot-dog-01.jpeg\"}]
Once you’ve submitted this command, your terminal should display the following responses:
$ Submitting jobs
$ {'message': '2 jobs submitted', 'truncated_inputs': False, 'batch_id': '12a34b56-cde7-8901-2345-fg6789hijk01'}
As you’ve submitted more than one image input, the data points are grouped into a batch. The batch_id allows you to retrieve information on the batch via our API .
If you do not see the above response, double check your API key, input URLs, and project ID in the CLI command before attempting the request again.
API request completeCongratulations! You have successfully made your first request and created a job using the super.AI CLI.
You can view your submitted jobs in the super.AI dashboard by navigating to your project and taking a look at the top of the project’s work queue.
Help!You can also use the
--helpflag at any time to gain more information about the CLI. For example enteringsuperai client create_jobs --helpdisplays the available flags for that command.
Updated 5 months ago
Now that you’re familiar with the basics of using the super.AI CLI to interact with our API, you can dive into our API reference to explore the other commands on offer.
