cURL
Learn how to submit jobs to the super.AI platform via cURL.
The super.AI API provides programmatic access to super.AI. Full details are listed in our API reference.
In this guide, you will get set up with the super.AI API by submitting a job via cURL and viewing it in your dashboard.
There are three steps required to submit your first job to super.AI through our API:
- Obtain your API key so super.AI can authenticate your request
- Locate your project ID to identify the project to which you are submitting the job
- Make an API request and observe the response so you can confirm your setup is correct
cURL, Python, and the command-line interface (CLI)This guide uses cURL, but you can also interact with our API using Python or the super.AI CLI.
If you're new to APIs, take a look at our Introduction to REST APIs to learn the the basics.
Before you begin
You will need to create and set up a super.AI project before you can follow the steps below. You will need to use the image categorization project type to follow this guide.
You will also need to make sure you have cURL installed on your machine. In your terminal, enter curl -V and press enter. You should see a response containing the currently installed cURL version. If you don't see your cURL version, you will need to download and install cURL.
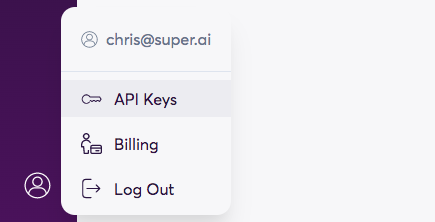
1. Obtain your API key
Super.AI uses API keys submitted in the request header to authenticate requests. Any request that does not include a valid API key will fail. Find your API key in the super.AI dashboard by hovering over the profile icon in the lower left of the screen, then heading to API keys. You can copy the key by clicking on the copy  button.
2. Locate your project ID
The project ID is essential to identify the project to which you want to submit a job.
In the super.AI dashboard, open the image categorization project that you created previously. The project ID is the universally unique identifier visible in your browser's URL bar.

You’re going to pass us the project ID in your request path, as you’ll see in the next step.
(Optional) Upload data to storage
For the purposes of this guide, we provide you with a URL for an image in the next step. If you want to upload your own images, you can upload them to your super.AI storage and generate URLs for them there. To find out more, head to our How to use data storage page.
3. Make an API request
With the essential information collected, you’re ready to make your first request to the super.AI API job endpoint. This is going to be a POST request in order to create a job with the data you specify.
There are four important elements to this request:
- The project ID. This is a path parameter, which goes in the request URL.
- The request method (POST). This is set using the
-Xoption (without this, the default method, GET, is used). - Your API key. This is submitted using the
-Hoption, which lets you to add an extra header to your request - The input data for the job. This is passed through the
inputsparameter. This parameter takes an array of objects. The input type (in our caseimage_url) is the key of each object and the URL pointing to the file is the value. It is possible to use multiple objects within the array to submit multiple jobs at once. Code for both single and multiple job submission can be found below.
In the code samples below, you will need to make the following changes:
- Replace
{api_key}with the API key from step 1 - Replace
{project_id}with the project ID from step 2

Copy one of the codeblocks below into a text editor, make the above adjustments to it, then copy and paste the edited code into your terminal and press enter.
Submit one job:
$ curl "https://api.super.ai/v1/apps/{project_id}/jobs" \
  -X POST \
  -H "API-KEY: {api_key}" \
  -d '{"inputs":[{"image_url":"https://cdn.super.ai/cool-bulldog.jpg"}]}'
Submit multiple jobs:
$ curl "https://api.super.ai/v1/apps/{project_id}/jobs" \
  -X POST \
  -H "API-KEY: {api_key}" \
  -d '{"inputs":[{"image_url":"https://cdn.super.ai/cool-bulldog.jpg},{"image_url":"data://replace/this/with/your/second/url.jpg"},{"image_url":"https://cdn.super.ai/hot-dog-01.jpeg"}]}'
Unlimited job creationThere is no limit to the number of jobs you can submit at once; just continue stringing objects together as in the second code sample.
Once you’ve submitted your request, your terminal should display a response like this:
{
  "message": "2 jobs submitted",
  "truncated_inputs": false,
  "batch_id": "a1b23456-7890-1234-c56d-7890123e4f56"
}
If you do not see the above response, double check your API key, input URLs, and project ID before attempting the request again.
API request completeCongratulations! You have successfully made your first request and created a job through the super.AI API.
You can view your submitted jobs in the super.AI dashboard by navigating to your project and taking a look at the top of the project’s work queue.
Updated 10 months ago
What's next
Now that you’re familiar with the basics of our API, you can dive into our API reference. Here you will find detailed information on every available endpoint, including lists of optional and required parameters.