Video bounding box labeling interface
The super.AI video bounding box labeling interface has a variety of features to help you label video fast. Below, you can learn in detail about each feature and see a list of all the keyboard shortcuts available within the video bounding box labeling interface.
Overview
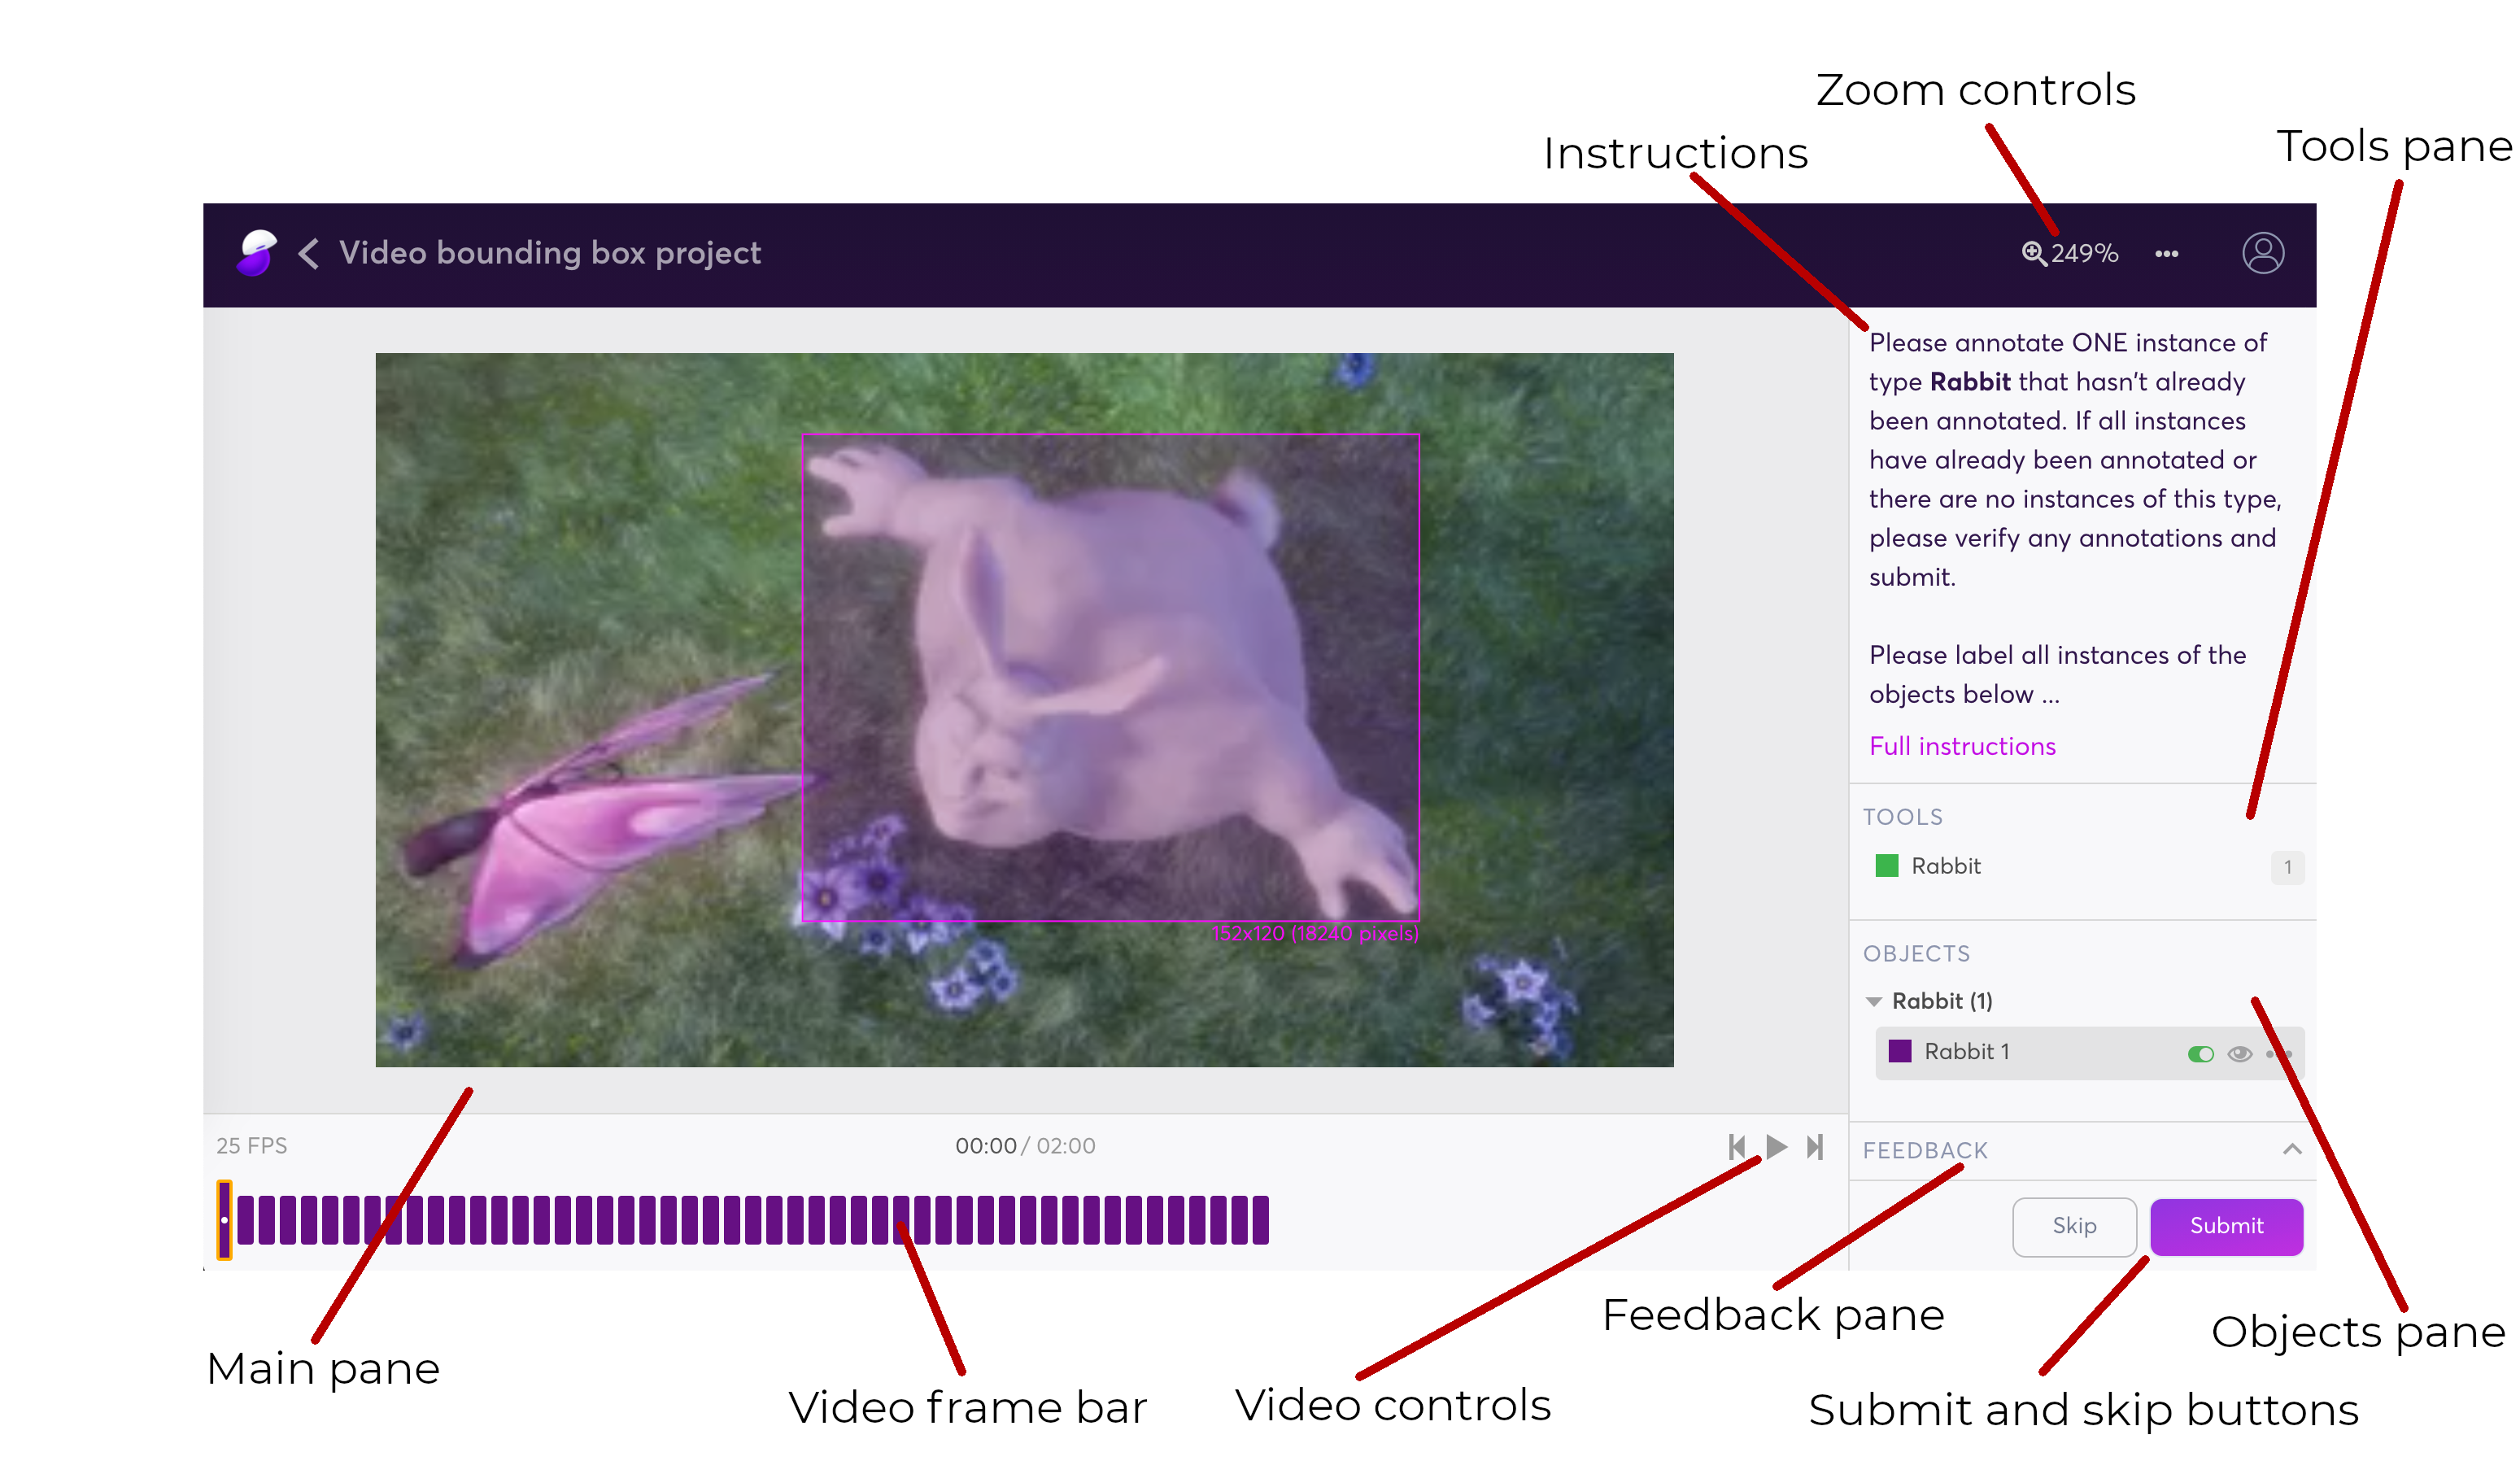
The video bounding box labeling interfaced (labeled)
Getting started
Here’s how to create your first bounding box:
- Choose a tool from the tools pane on the right
- When you move your cursor over the main pane, it will turn into a crosshair. Click within the main pane to start a bounding box.
- Move your cursor to another location within the main pane
- Click again to finish the bounding box
A corresponding object will appear in the objects pane in the lower right.
An efficient way to label an object is as follows:
- Find the earliest frame in which your object appears
- Draw a bounding box over the object
- Find the final frame where the object appears
- Adjust the bounding box to fit the object in the final frame. The interface will then automatically interpolate the bounding box for the frames in between.
- Click through the intermediary frames (starting with the frame in the center) and adjust the bounding box as needed
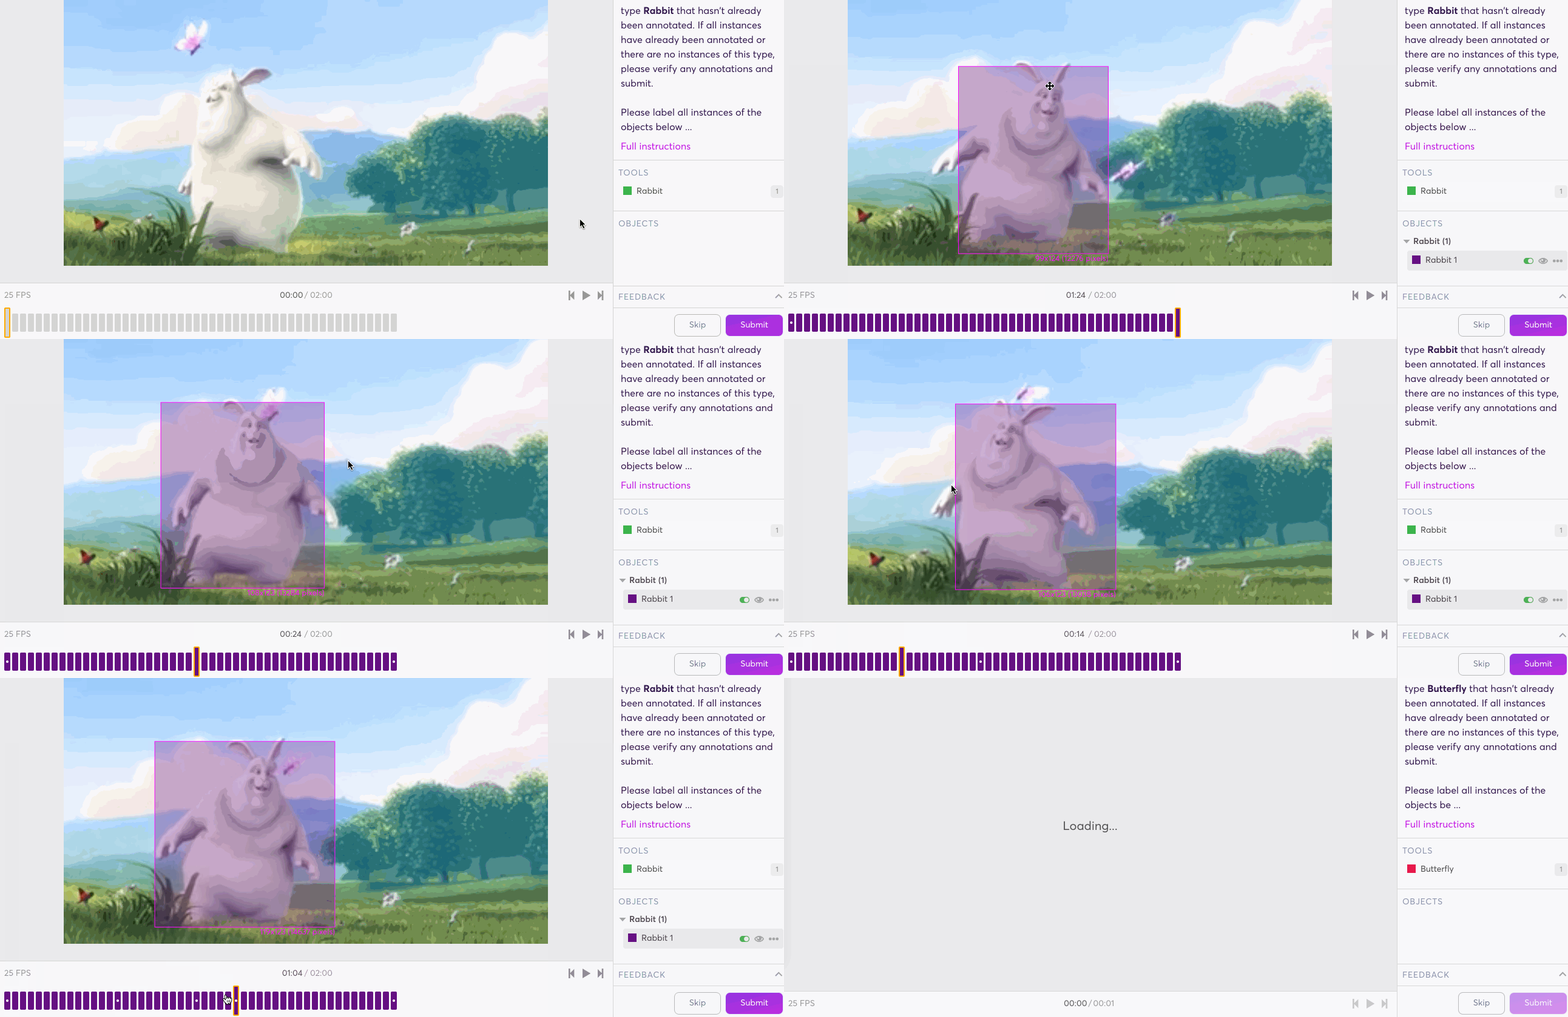
An animation showing how to create and adjust a bounding box
Navigating the video frames
The video frame bar provides information on the frames within the video and some tools for controlling the video.

The video frame bar
The playback position is shown top and center of the video frame bar. The format is second_of_playback:frame_number_within_that_second. The frame count starts at zero, so a 30 FPS video will display 0–29 after the colon. If you have a 10-second 30 FPS video, and the frame you selected is in the 9th second of the video and the 23rd frame of that second, the position would read 09:22.
Hover over a frame in the video frame bar to have it display in the main pane. Hovering over frames is useful for skimming through the video. Click on a frame to select it. A selected frame will not change when you move the mouse out of the frame bar, whereas a hovered frame will.
You can control the video using the playback controls at the top right of the video frame bar. Use  to skip to the first frame,
  to skip to the last frame, and
  /
/ to play and pause the video.
Use the scroll bar below the frames to quickly navigate larger video clips. The scroll bar indicates where frames of the currently selected object are located.
Sometimes videos will feature buffer video at the start and end of the clip. This is to provide context for the video. Buffer zones will display with horizontal stripes over them and cannot be labeled or edited.
Zooming and panning
There are several options for controlling the zoom:
- Press cmd/ctrl and the
+and-keys on your keyboard - Hold
Zand click your mouse to zoom in and hold alt +Zand click to zoom out - Click
 Zoom at the top right of the interface and use the slider to adjust the zoom level
There are also options to Fit (shift + 1), which will adjust the video to fit entirely within the main pane, and Actual size (shift + Z), which will display the video at its natural resolution.
You can pan the video by clicking and dragging in the main pane or by using the scrollers on your mouse.
Interpolating frames
For any object, there are three types of frames: keyframes, interpolated frames, and model-interpolated frames.
- Keyframes are frames where the size and position of the bounding box has been manually set, either by you or a previous labeler. These frames are shown in the video frame bar with a white dot on them
 .
. - Interpolated frames are the frames where the bounding box hasn’t been manually defined. Instead, the interface has inferred what the bounding box should look like. It does this by looking at the closet keyframes on either side, and interpolating between them. These frames are a block purple
 .
. - Model-interpolated frames are like interpolated frames, but the object has been tracked by a machine learning model. These frames appear in the video frame bar with a white circle outline on them
 . See the automated object tracking section for more information.
When you create a bounding box for an object on a certain frame, the bounding box is automatically added to all subsequent frames in the video. If you edit the bounding box on any of the subsequent frames, a keyframe is created and the movement of the bounding box between the two keyframes is interpolated to create a continuous movement.
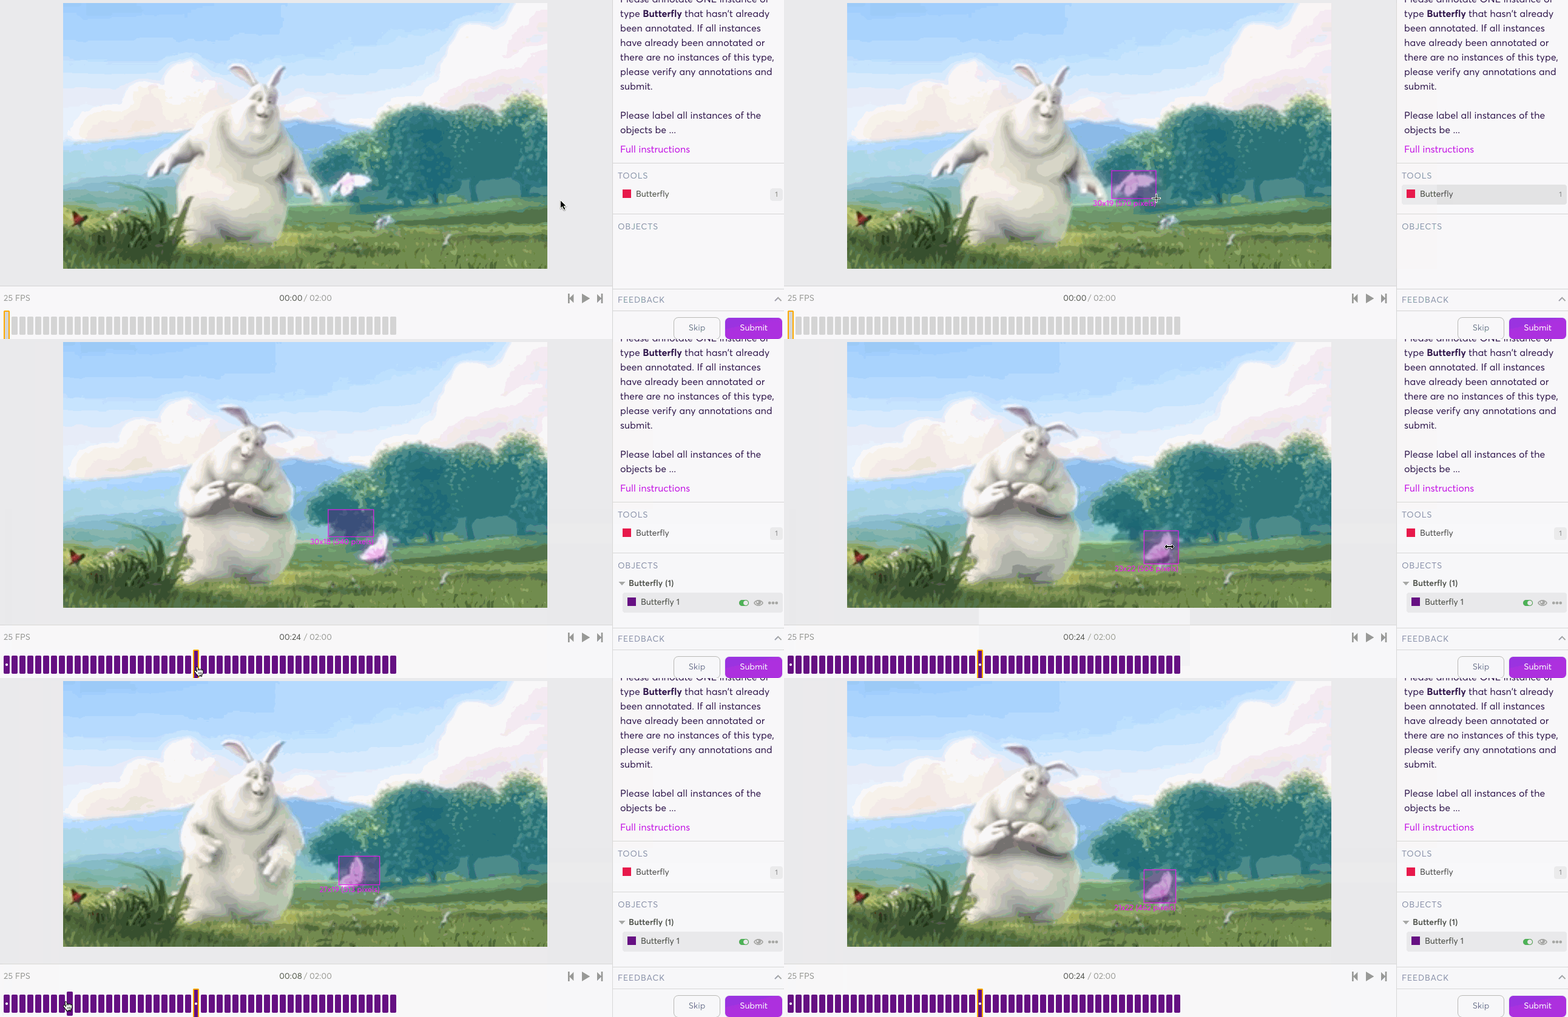
An animation showing how to create a keyframe
Sometimes you want to remove a keyframe to make the movement smoother. You do this by converting the frame to an interpolated frame. Here’s how:
- Select the object
- Navigate to the keyframe
- Then you have two options:
a. PressIon your keyboard
b. Click next to the object in the objects pane then click Convert to interpolated frame.
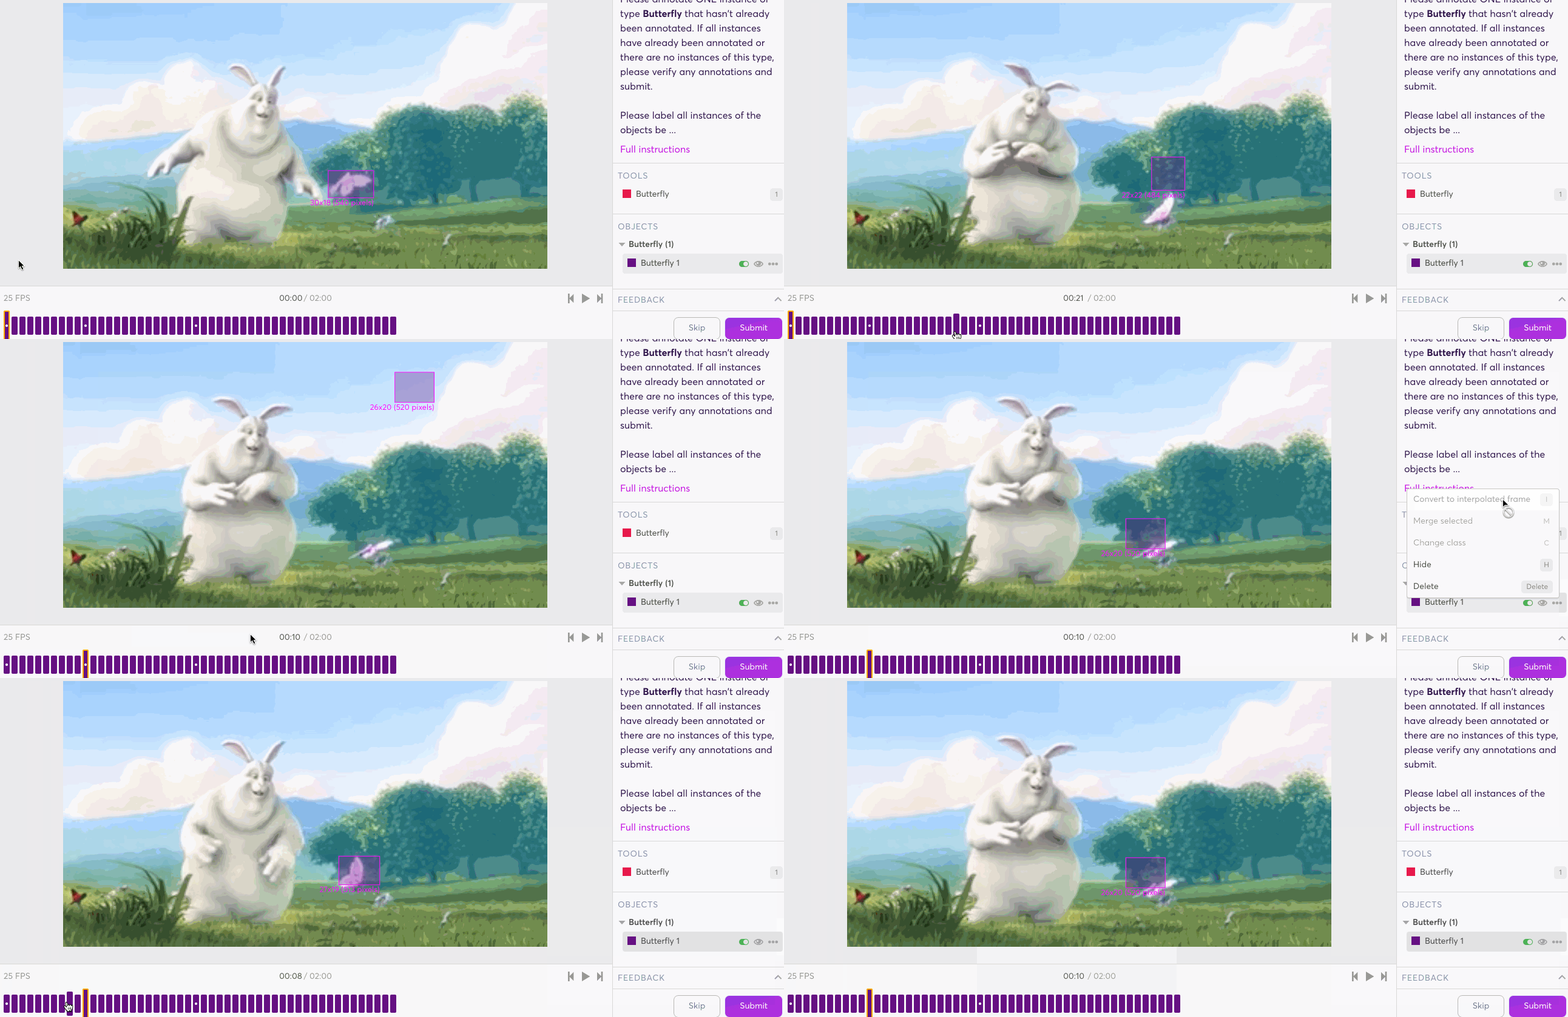
An animation showing how to convert a keyframe to an interpolated frame
Automated object tracking
Make use of a machine learning model to automatically track an object.
Adding tracking
- Draw a bounding box over an object
- If the object moves out of frame before the end of the video, turn the bounding box off on the appropriate frame
- Add tracking:
- Press
ton your keyboard, or; - In the objects pane, click
 to the right of the relevant object, then click Add tracking
- Press
- Wait for the tracking to complete. When it’s done, you will see the tracked frames appear in the video frame bar with a white circle outline on them
 .
.
Tracking is applied to the closest segment of frames to the selected frame. A segment is a group of interpolated frames surrounded by keyframes (or the end of the video).
Tracking is currently limited to 40 frames. If you want to track an object over more frames, track the first 40, then run tracking again.
Removing tracking
Remove tracking from a segment of frames by selecting the relevant object in the objects pane and pressing shift + t on your keyboard or by clicking  to the right of the relevant object in the objects pane and clicking Remove tracking. If you have a keyframe selected when you remove tracking, you will remove all frames to the right of the keyframe up until the next keyframe.
Updating tracking
An exclamation mark appears over a tracked frame if running tracking again might produce different results  . This happens when you modify the keyframe that tracking was calculated with, or convert a tracked frame into a keyframe. Update tracking by pressing
 t on your keyboard or by clicking  to the right of the relevant object in the objects pane and clicking Update tracking.
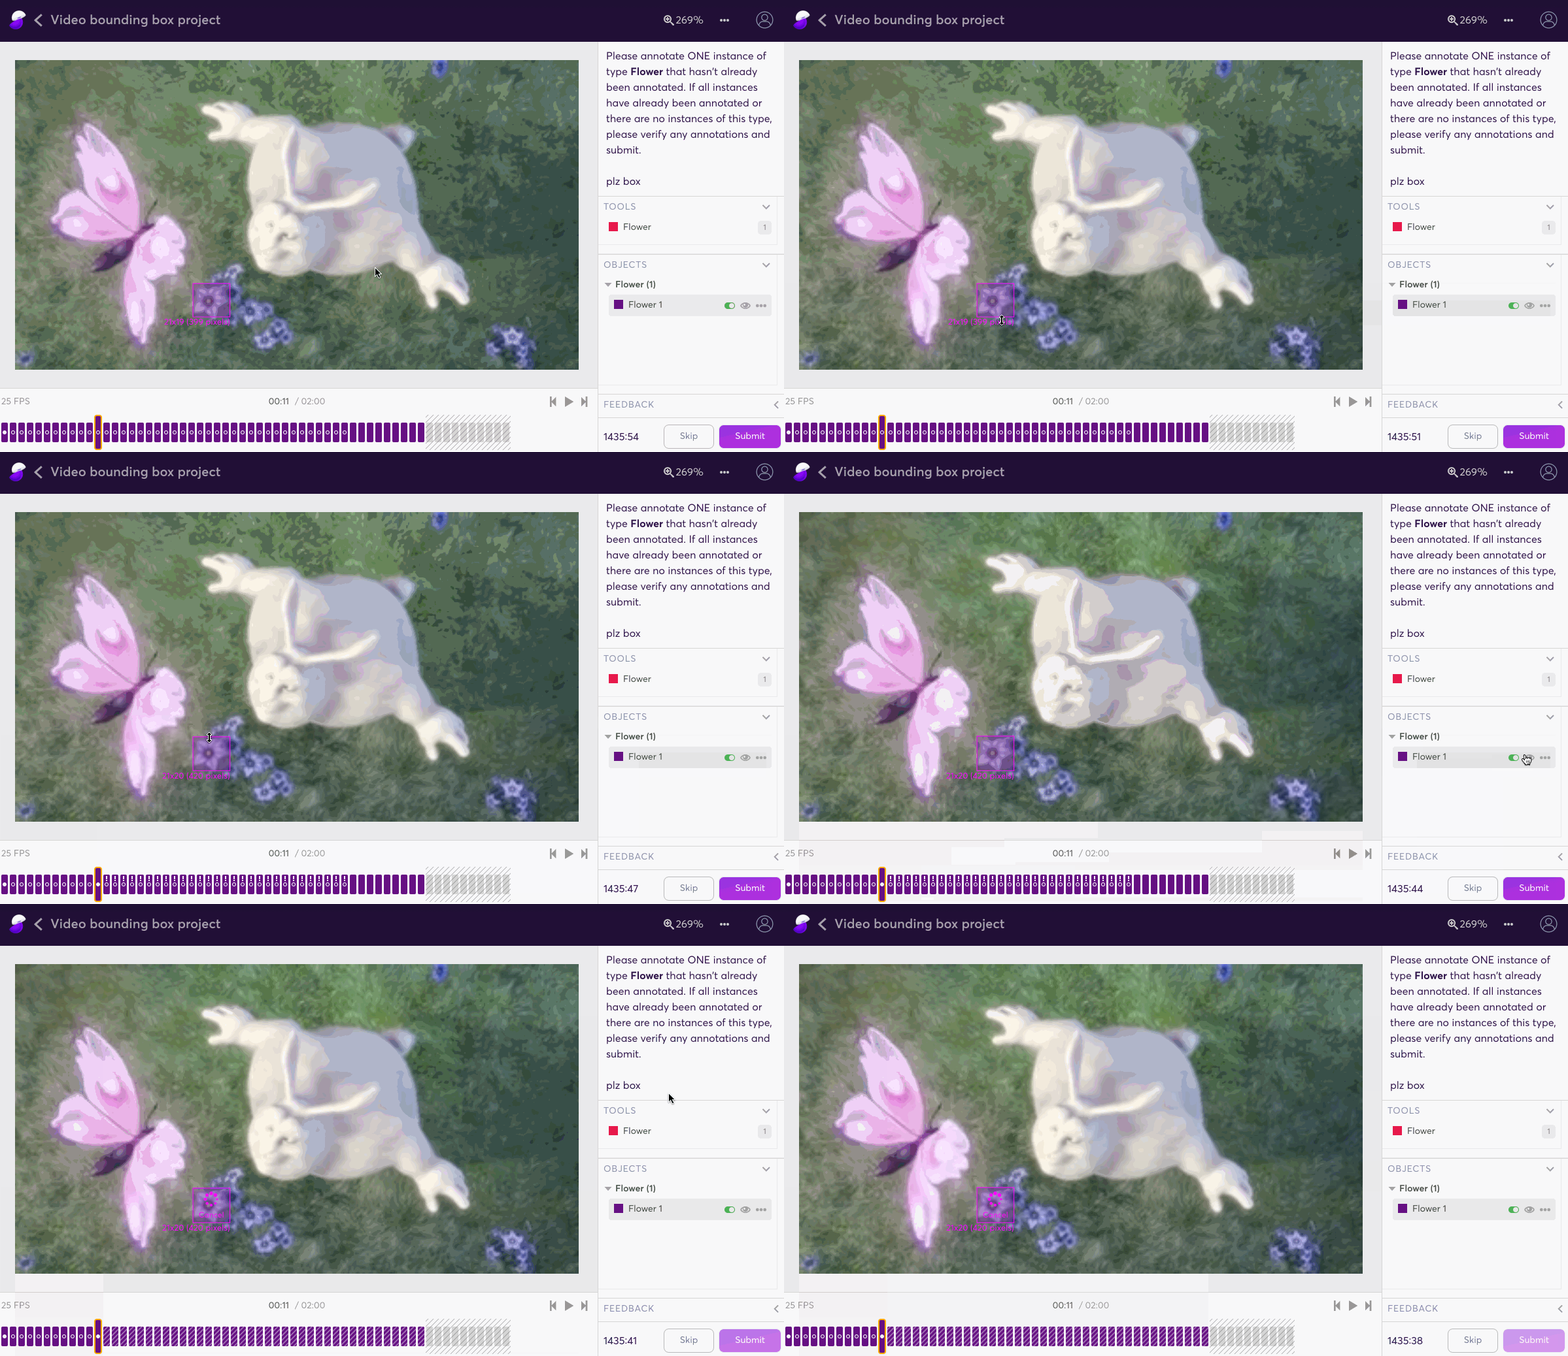
An animation showing how to update automated object tracking
Turning bounding boxes off/on from frames
When you add a bounding box to a frame, the bounding box is automatically added to all subsequent frames. You can turn off a bounding box by pressing T on your keyboard with the relevant object and frame selected (or using the toggle in the objects pane).
Turning a bounding box off removes it from the current frame and all subsequent frames until the next keyframe or the end of the video (whichever comes first).
You can use this feature for several reasons:
- An object goes out of frame before the end of the video
- An object disappears then reappears
- A bounding box has been created a few frames after the object appears and you need to extend the bounding box back in time
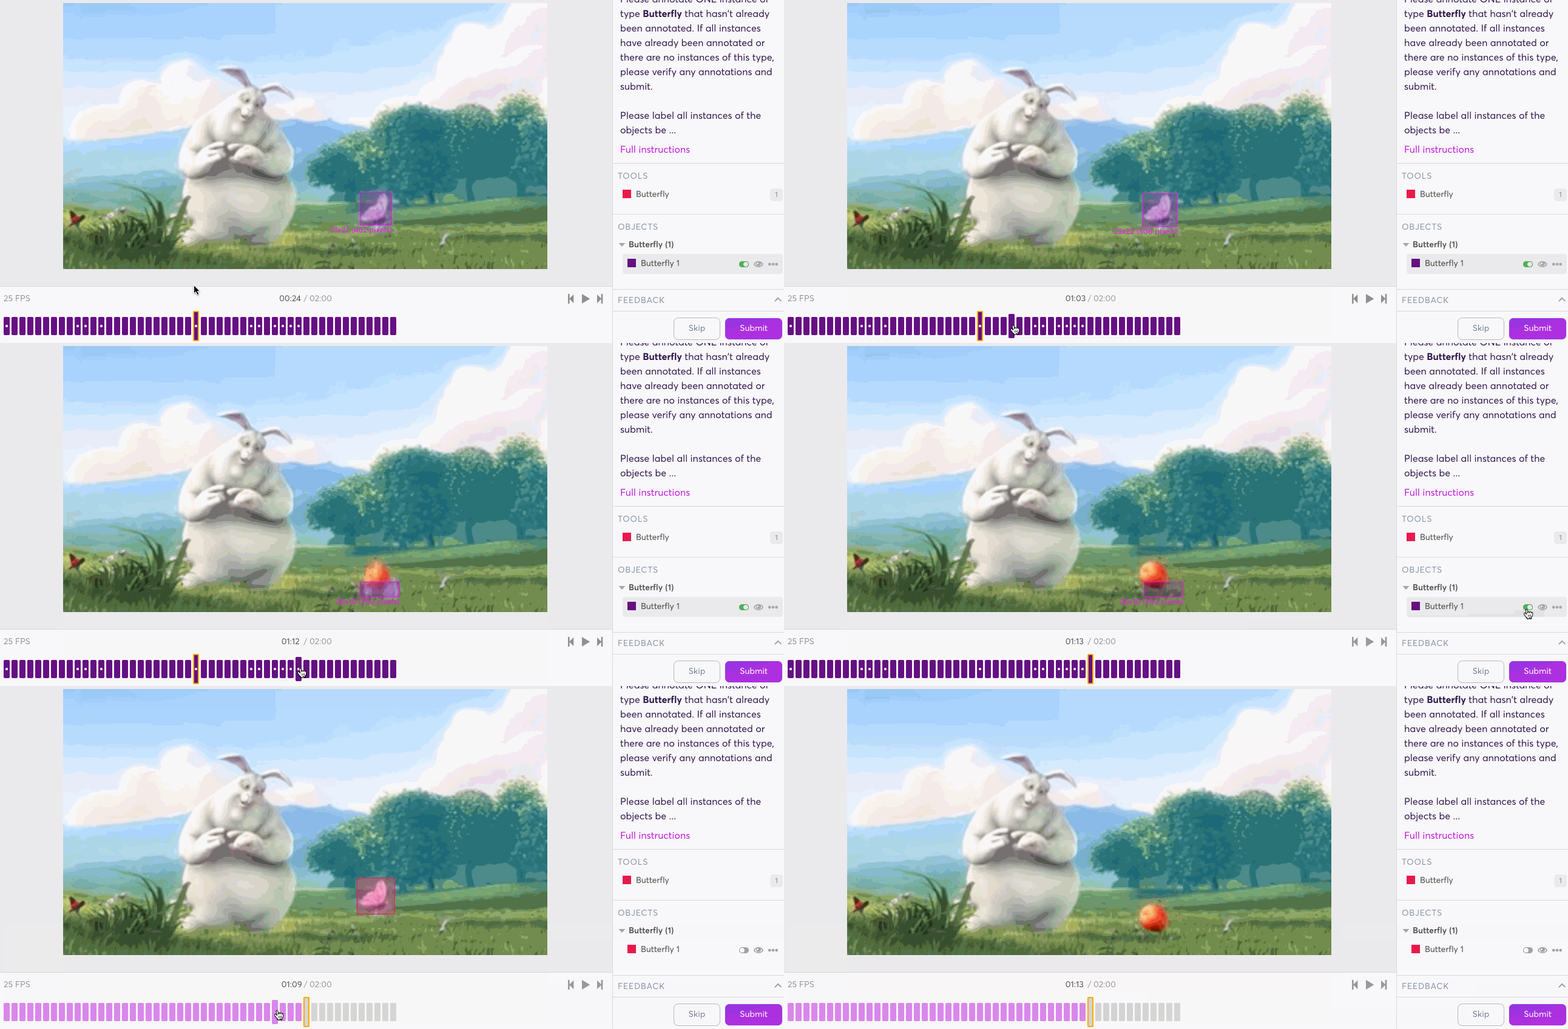
An animation showing how to toggle a bounding box off
Merging objects
You can merge multiple objects into their combined average by selecting more than one object (hold down the cmd/ctrl key and click on the objects) and pressing M on your keyboard (or by clicking  to the right of one of the selected objects in the objects pane and clicking Merge selected). Merging objects can be useful when multiple overlapping or similar bounding boxes have been applied to a single object.
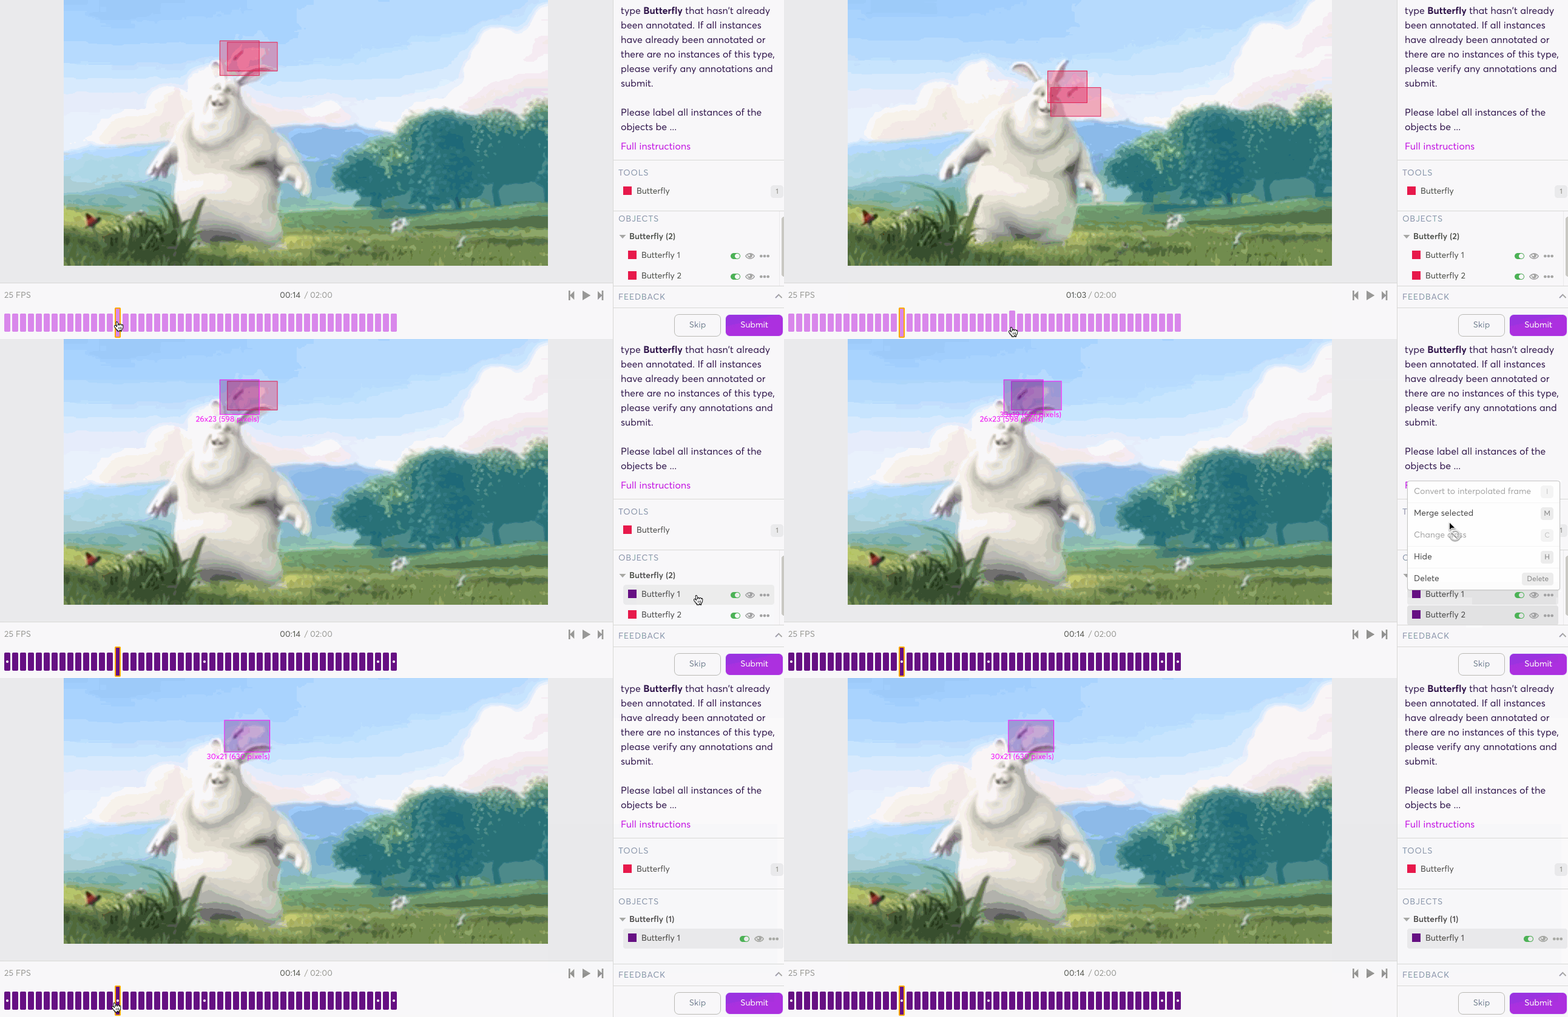
An animation showing how to merge objects
Changing object classes
If you have labeled an object using the wrong class, you can change the class at any time by selecting it and pressing C on your keyboard (or by clicking on  to the right of the object in the objects pane, select Change class, and choose the correct class from the list).
Hiding and deleting objects
Hide an object from view by selecting the object and pressing H on your keyboard (or by clicking  Hide besides any object in the objects pane). Hiding objects is useful if there are a lot of bounding boxes and it is difficult to see the video itself.
Hiding objects is different to turning them off: hidden objects are still there, they are just temporarily invisible.
Delete an object by selecting the object and pressing delete/backspace(or by clicking  next to an object in the objects pane and clicking Delete.
Leaving feedback
You can leave feedback on your current task by pressing F on your keyboard (or by clicking Feedback at the lower right of the screen). Once in the feedback pane, you can select a feedback type and leave a brief description of the problem.
If you decide to Skip the task (see the skip section for details) you will need to leave feedback.
Skipping tasks
You can click Skip at the lower right of the labeling interface to skip tasks that are not possible to complete, whether due an input data problem, ambiguous or incomplete instructions, or any other reason. You will be prompted to provide a reason for skipping. Just select a feedback type and enter a brief description of the problem before clicking Confirm skip.
Autosave
Tasks that you are working on in the labeling interface autosave after 5 seconds of inactivity to protect against lost progress. It's possible to disable this feature by expanding the  Options menu and sliding the Save draft automatically toggle off.
Keyboard shortcuts
You can view the available keyboard shortcuts at any time within the labeling interface by pressing the ? key on your keyboard.
Submit task | Cmd/ctrl + S |
Skip task | Cmd/ctrl + J |
Open/close feedback pane | F |
Select a feedback option (when in the feedback pane) | 0–9 |
Zoom video in |
|
Zoom video out | Cmd/ctrl + |
Zoom video to fit | Shift + 1 |
Zoom video to actual size | Shift + 0 |
Pan video | Shift + click and drag |
Undo | Cmd/ctrl + Z |
Redo | Cmd/ctrl + shift + Z |
Select a tool | 1–9, Q, W, E, R, etc. |
Deselect tool | Esc |
Delete selected object | Delete/backspace |
Change class of selected object | C |
Turn on/off selected object from current and subsequent frames | T |
Convert current frame to interpolated frame | I |
Merge selected objects | M |
Move one frame forward/back | Shift + left/right arrow |
Jump to first/last frame of video | Cmd/ctrl + shift + left/right arrow |
Play/pause video playback | Space |
Updated 3 months ago
